前端面试基础题:node.js内置模块、Webpack热更新原理...
✨ node.js内置模块
fs模块
用来操作文件的模块。
| 方法 | 作用 |
|---|---|
| fs.readFile(path[, options], (data, err) => {}) | 读取指定文件中的内容,options为编码格式 |
| fs.writeFile(path, data[, options], err => {}) | 写入文件,只能创建文件,不能创建文件夹,会覆盖旧内容 |
path模块
用来处理路径的模块。
| 方法 | 作用 |
|---|---|
| path.join([…paths]) | 将多个路径片段拼接为完整的路径字符串…paths为路径片段序列 |
| path.basename(path[, ext]) | 获取路径最后一部分文件名,ext表示扩展名,返回结果会去掉扩展名 |
| path.extname(path) | 获取路径中的扩展名部分 |
http模块
用来创建web服务器的模块。
// 导入http模块
const http = require('http');
// 创建web服务器实例
const server = http.createServer();
// 为服务器绑定request事件,监听客户端发送的网络请求
server.on('request', (req, res) => {
console.log('Someone visit our web server');
const str = `Your request url is ${req.url}, and request method is ${req.method}`;
console.log(str);
// 防止中文显示乱码
res.setHeader('content-Type', 'text/html;charset=utf-8');
// 向客户端发送指定内容,并结束这次请求的处理过程
res.end(str);
})
// 启动当前web服务器实例
server.listen(80, () => {
console.log('http server running at http://127.0.0.1')
})
✨ 包的分类
在项目根目录中有一个package.json的配置文件,用来记录项目中安装了哪些包。这些包安装到node_modules文件夹下。包分为两类:
- 开发依赖包:被记录到
devDependencies节点中,只在开发期间用到。(安装时使用—save-dev或-D) - 核心依赖包:被记录到
dependencies节点中,在开发期间和项目上线后都会用到。(安装时使用-save或-S,默认) - 全局安装 (
-g)
✨ Express
和http内置模块类似,提供了快速创建web服务器的便捷方法。
Express路由匹配
- 按照定义的先后顺序进行匹配
- 请求类型和请求的URL同时匹配成功,才会调用对应的处理函数。
// 简单用法
const express = require('express');
const app = express();

app.get('/user/:id', (req, res) => {
	// req.params存放着通过动态匹配到的参数值id
	// req.query 查询字符串
	res.send('Hello World');  // 发送给客户端的内容
});
app.post('/', (req, res) => {
	res.send('Post Request');
});

app.listen(80, () => {
	console.log('express server running at http://127.0.0.1')
});

// 模块化路由
var express = require('express');
var router = express.Router();  // 创建路由对象
router.get('user/list', (req, res) => {
	res.send('Get user list');
});
router.post('user/add', (req, res) => {
    res.send('Add new user');
});
module.exports = router;
Express中间件
当一个请求到达服务器,可以连续调用多个中间件,从而对这次请求进行预处理。中间件函数的形参列表中,必须包含next参数,它表示把流转关系转交给下一个中间件或路由。多个中间件,共享同一份req和res。
✨ mysql模块
mysql是托管于npm上的第三方模块,它提供了在Node.js项目中连接和操作MySQL数据库的能力。
- 配置mysql模块
const mysql = require('mysql');
const db = mysql.createPool({
    host: '127.0.0.1',
    user: 'root',
    password: 'admin123',
    database: 'my_db_01'
});
2. 使用mysql模块操作数据库
// sqlStr是要执行的sql语句,其中可以用英文?作占位符
// []中存放对应占位符的数据
db.query(sqlStr, [], (err, results) => {
    if (err) return console.log(err.message);
    if (results.affectedRows === 1) {}
});
✨ 身份认证
HTTP协议的无状态性,指的是客户端每次的HTTP请求是独立的,连续多个请求之间没有直接的关系,服务器不会主动保留每次HTTP请求的状态。常用的三种身份认证方法:cookie、session、JWT(JSON Web Token),用于验证用户身份和权限。
Cookie
Cookie 是服务器发送给客户端的小数据文件,用于存储用户的登录信息和其他网站相关的数据,通常被用来维护用户的状态和记住用户的登录信息。当用户在浏览器上访问网站时,在服务器上对其进行身份验证,验证通过后会生成一个包含用户数据的 Cookie 并返回给客户端。当用户下一次访问同一网站时,浏览器会自动将 Cookie 发送给服务器,服务器通过验证后继续提供服务。
Cookie 的优点是易于实现,可以跨越不同的网站和系统,提高了用户的访问效率。但也存在一些缺点,如 Cookie 可能会被恶意软件或黑客窃取,造成用户隐私泄露和安全问题;Cookie 的有效期也可能会因客户端清除缓存或浏览器设置而导致失效。
Session
Session 是服务器端的一段信息,存储在服务器上,通常用来记录用户登录状态和其他相关信息。当用户第一次访问网站时,服务器会在服务器端创建一个记录用户信息的 Session 对象,并生成一个唯一的 Session ID,服务器将该 Session ID 返回给客户端,并在客户端的 Cookie 中保存该 ID。客户端在下次请求时,会将该 Cookie 中的 Session ID 带到服务器端,服务器端则根据 Session ID 找到对应的 Session 数据,并验证该 Session 是否有效以及用户的权限等信息。
Session 身份认证的优点在于服务器端存储 Session 数据,与 Cookie 不同,能够避免身份信息泄露的问题。Session 身份认证的缺点在于,服务器需要维护 Session 数据,当在线用户数过多时,服务器的负载会增加,需要相应的服务器资源进行支持。同时,Session 数据保存在服务器端,无法在不同的服务器之间共享,这也限制了使用 Session 在分布式的环境中进行身份认证的能力。
JWT
JWT 是一种用于身份认证的开放标准,是一种安全、紧凑和自包含的方式来声明各种信息,包括用户身份和访问权限。其基于 JSON 格式编码,由三个部分组成:头部(Header)、负载(Payload)和签名(Signature)。其中,头部包含加密算法、负载的数据类型等信息;负载包含需要传输的信息,例如用户的唯一标识、过期时间等;签名是一个用于验证消息完整性和验证发送者身份的 HMAC 算法。
在客户端使用 JWT 时,通常可以把它存储在 Cookie 或者本地存储中,然后在需要访问受保护资源的时候携带 JWT,服务器端可以解密 JWT 中的信息,验证 JWT 是否合法,并获取用户信息和权限。
✨ 异步编程
异步编程方法:回调函数、发布订阅模式、Promise对象、生成器函数Generator、async/await。
(一)回调函数
ajax('aaa', () => {
    // callback函数体
    ajax('bbb', () => {
        // callback函数体
        ajax('ccc', () => {
            // callback函数体
        })
    })
})
回调函数的优点是简单、容易理解和实现,缺点是存在回调地狱问题(异步回调函数的嵌套),而且每个任务只能指定一个回调函数。此外它不能使用try...catch捕获错误,不能直接 return。
(二)Promise
Promise对象可以将异步操作以同步操作的流程表达出来,避免了层层嵌套的回调函数。
ajax('aaa').then(res => {
    return ajax('bbb')
}).then(res => {
    return ajax('ccc')
})
Promise的内部错误使用try catch捕获不到,只能只用then的第二个回调或catch来捕获。Promise一旦新建就会立即执行,无法取消。
Promise对象
- Promise构造函数创建一个Promise实例,接受一个函数作为参数,该函数的两个参数分别是
resolve和reject两个函数,由JS引擎提供,不需要自己部署。resolve函数的作用是在异步操作成功时调用,并将异步操作的结果,作为参数传递出去;reject函数的作用是在异步操作失败时调用,并将异步操作报出的错误作为参数传递出去。 - Promise实例生成之后,可以用
then方法分别指定fulfilled状态和rejected状态的回调函数。then方法可以接受两个回调函数作为参数,第一个回调函数时Promise对象状态变为fulfilled状态时调用,第二个回调函数时Promise对象变为rejected时调用,两个都是可选的,它们都接受Promise对象传出的值作为参数。
| Promise原型方法 | 作用 |
|---|---|
| Promise.prototype.then() | 当 Promise 变成 fulfilled 状态时调用的函数 |
| Promise.prototype.catch() | 当 Promise 变成 rejected 状态时调用的函数 |
| Promise.prototype.finally() | 在 Promise 结束时,无论结果是 fulfilled 或者是 rejected,都会执行的回调函数 |
const promise = new Promise(function (resolve, reject) {
    if (异步操作成功) {
        resolve(value);
    } else {
        reject(error);
    }
});

promise.then(function (value) {}, function (error) {});
promise.then()  // 成功时执行的回调函数
    .catch()  // 指定发生错误时的回调函数
    .finally()  // 不管Promise对象最后状态如何,都会执行的方法
| Promise其他方法 | 作用 |
|---|---|
| Promise.all([p1, p2, p3]) | 用于将多个Promise实例包装成一个新的Promise实例,等到结果都返回了,才会触发回调函数 |
| Promise.race([p1, p2, p3]) | 用于将多个Promise实例包装成一个新的Promise实例,只要任何一个异步操作完成,就立即执行回调函数 |
let p1 = Promise.resolve('aaa');
let p2 = Promise.resolve('bbb');
let p3 = Promise.resolve('ccc');
let p4 = Promise.reject('ddd');
Promise.all([p1, p2, p3]).then(res => {
    console.log(res);
}).catch(err => {
    console.log(err);
})  // [ 'aaa', 'bbb', 'ccc' ]


Promise.all([p1, p2, p3, p4]).then(res => {
  console.log(res);
}).catch(err => {
  console.log(err);
})  // ddd


Promise.race([p1, p2, p3, p4]).then(res => {
    console.log(res);
}).catch(err => {
    console.log(err);
})  // aaa
手写Promise
- Promise的声明
- 用
class来声明Promise类。 - Promise构造函数中传入一个executor函数,传入就执行。
- executor函数有两个参数:
resolve和reject,分别为成功执行的函数和失败执行的函数。
class MyPromise {
    constructor(executor) {
        let resolve = () => {};  // 成功
        let reject = () => {};  // 失败
        executor(resolve, reject);  // 立即执行
    }
}
2. 基本状态
- Promise存在三个状态:
pending、fulfilled、rejected。 pending(等待态)为初始态,并可以转化为fulfilled(成功态)和rejected(失败态)。- 成功时,不可转为其他状态,且必须有一个不可改变的值(value)。
- 失败时,不可转为其他状态,且必须有一个不可改变的原因(reason)。
new Promise((resolve, reject)=>{resolve(value)})resolve为成功,接收参数value,状态改变为fulfilled,不可再次改变。new Promise((resolve, reject)=>{reject(reason)})reject为失败,接收参数reason,状态改变为rejected,不可再次改变。- 若是executor函数报错,直接执行
reject()。
class MyPromise {
    constructor(executor) {
        this.state = 'pending';  // 初始状态为等待态pending
        this.value = undefined;  // 成功的值
        this.reason = undefined;  // 失败的原因

        let resolve = (value) => {  // 成功
            if (this.state === 'pending') {
                this.state = 'fulfilled';
                this.value = value;
            }
        };
        let reject = () => {  // 失败
            if (this.state === 'pending') {
                this.state = 'rejected';
                this.reason = reason;
            }
        };

        // 若是exector函数报错,直接执行reject
        try {
            exector(resolve, reject);
        } catch (err) {
            return reject(err);
        }
    }
}
3. then方法
then方法中有两个参数:onfulfilled和onRejected。- 当状态
state为fulfilled,则执行onFulfilled,传入this.value。当状态state为rejected,则执行onRejected,传入this.reason。
class MyPromise {
    constructor (executor) {...},

    then (onFulfilled, onRejected) {
        if (this.state === 'fulfilled') {
            onFulfilled(this.value);
        }
        if (this.state === 'rejected') {
            onRejected(this.reason);
        }
    }
}
4. 异步实现
- 当
resolve在setTimeout内执行then时,状态还是pending等待状态。我们就需要在then调用的时候,将成功回调函数和失败回调函数存到各自的数组,一旦reject或者resolve,就调用它们。成功或者失败时使用forEach调用数组中的回调函数。
class MyPromise {
    constructor(executor) {
        this.state = 'pending';
        this.value = undefined;
        this.reason = undefined;

        // 存放成功回调的函数
        this.onResolvedCallbacks = [];
        // 存放失败回调的函数
        this.onRejectedCallbbacks = [];

        let resolve = (value) => {
            if (this.state === 'pending') {
                this.state = 'fulfilled';
                this.value = value;
                // 一旦resolve执行,调用成功回调数组中的函数
                this.onResolvedCallbacks.forEach(fn => fn());
            }
        };
        let reject = (reason) => {
            if (this.state === 'pending') {
                this.state = 'rejected';
                this.reason = reason;
                // 一旦reject执行,调用失败回调数组中的函数
                this.onRejectedCallbacks.forEach(fn => fn());
            }
        };

        try {
            exector(resolve, reject);
        } catch (err) {
            reject(err);
        }
    }

    then (onFulfilled, onRejected) {
        if (this.state === 'fulfilled') {
            onFulfilled(this.value);
        }
        if (this.state === 'rejected') {
            onRejected(this.reason);
        }

        // 当状态为pending时
        if (this.state === 'pending') {
            // onFulfilled传到成功回调数组
            this.onResolvedCallbacks.push(() => {
                onFulfilled(this.value);
            });
            // onRejected传到失败回调数组
            this.onRejectedCallbacks.push(() => {
                onRejected(this.reason);
            });
        }
    }
}
5. 解决链式调用
- 为了达成链式,在then里面返回一个新的promise,称为promise2:
promise2 = new Promise((resolve, reject)=>{}) - 将这个
promise2返回的值传递到下一个then中,如果返回一个普通的值,则将普通的值传递到下一个then中。 onFulfilled()或onRejected()的值,即第一个then返回的值,叫做x,判断x的函数叫做resolvePromise。resolvePromise函数:- 首先,要看x是不是promise
- 如果是promise,则取它的结果,作为新的promise2成功的结果
- 如果是普通值,直接作为promise2成功的结果
- 所以要比较x和promise2
resolvePromise的参数有promise2(默认返回的promise)、x(我们自己return的对象)、resolve、rejectresolve和reject是promise2的
class MyPromise {
    constructor (executor) {...},
    then (onFulfilled, onRejected) {
        // 声明返回的promise2
        let promise2 = new Promise((resolve, reject) => {
            if (this.state === 'fulfilled') {
                let x = onFulfilled(this.value);
                resolvePromise(promise2, x, resolve, reject);
            }
            if (this.state === 'rejected') {
                let x = onRejected(this.reason);
                resolvePromise(promise2, x, resolve, reject);
            }
            if (this.state === 'pending') {
                this.onResolvedCallbacks.push(() => {
                    let x = onFulfilled(this.value);
                    resolvePromise(promise2, x, resolve, reject);
                });
                this.onRejectedCallbacks.push(() => {
                    let x = onRejected(this.reason);
                    resolvePromise(promise2, x, resolve, reject);
                });
            }
        });
        // 返回Promise,完成链式
        return promise2;
    }
}

function resolvePromise(promise2, x, resolve, reject) {
    // 循环引用报错
    if (x === promise2) {
        return rejected(new TypeError('Chaining cycle detected for promise'));
    }
    // 防止多次调用
    let called;
    // x不是null,且x是对象或者函数
    if (x !== null && (typeof x === 'object' || typeof x === 'function')) {
        try {
      	    let then = x.then;
      	    // 如果then是函数,就默认是promise了
      	    if (typeof then === 'function') {
                // 就让then执行 第一个参数是this 后面是成功的回调和失败的回调
                then.call(x, y => {
                    if (called) return;
                    called = true;
                    // resolve的结果依旧是promise,继续解析
                    resolvePromise(promise2, y, resolve, reject);
                }, err => {
                    // 成功和失败只能调用一个
                    if (called) return;
                    called = true;
                    reject(err);
                });
            } else {
                resolve(x);
            }
        } catch (e) {
            if (called) return;
            called = true;
            reject(e);
        }
    } else {
        resolve(x);
    }
}
6. 其他问题
onFulfilled,onRejected都是可选参数,如果他们不是函数,必须被忽略。onFulfilled返回一个普通的值,成功时直接等于value => value;onRejected返回一个普通的值,失败时直接扔出一个错误err => throw err。onFulfilled或onRejected不能同步被调用,必须异步调用。可以用setTimeout解决异步问题。
then(onFulfilled,onRejected) {
    // onFulfilled如果不是函数,就忽略onFulfilled,直接返回value
    onFulfilled = typeof onFulfilled === 'function' ? onFulfilled : value => value;
    // onRejected如果不是函数,就忽略onRejected,直接扔出错误
    onRejected = typeof onRejected === 'function' ? onRejected : err => { throw err };

    let promise2 = new Promise((resolve, reject) => {
        if (this.state === 'fulfilled') {
            // 异步
            setTimeout(() => {
                try {
                    let x = onFulfilled(this.value);
                    resolvePromise(promise2, x, resolve, reject);
                } catch (e) {
                    reject(e);
                }
            }, 0);
        }
        if (this.state === 'rejected') {
            // 异步
            setTimeout(() => {
                // 如果报错
                try {
                    let x = onRejected(this.reason);
                    resolvePromise(promise2, x, resolve, reject);
                } catch (e) {
                    reject(e);
                }
            }, 0);
        };
        if (this.state === 'pending') {
            this.onResolvedCallbacks.push(() => {
                // 异步
                setTimeout(() => {
                    try {
                        let x = onFulfilled(this.value);
                        resolvePromise(promise2, x, resolve, reject);
                    } catch (e) {
                        reject(e);
                    }
                }, 0);
            });
            this.onRejectedCallbacks.push(() => {
                // 异步
                setTimeout(() => {
                    try {
                        let x = onRejected(this.reason);
                        resolvePromise(promise2, x, resolve, reject);
                    } catch (e) {
                        reject(e);
                    }
                }, 0)
            });
        };
    });
    // 返回promise,完成链式
    return promise2;
  }
7. catch、resolve、reject、race、all方法
// catch方法
catch(fn){
    return this.then(null, fn);
}

// resolve方法
resolve (val) {
    return new MyPromise((resolve, reject) => {
        resolve(val);
    })
}

// reject方法
reject (val) {
    return new MyPromise((resolve, reject) => {
        reject(val);
    })
}

// race方法
race (promises) {
    return new Promise((resolve, reject) => {
        for (let i=0; i < promises.length; i++) {
            promises[i].then(resolve, reject);
        }
    });
}

// all方法
all (promises) {
    let arr = [];
    let i = 0;
    function processData (index, data) {
        arr[index] = data;
        i++;
        if (i ===promises.length) {
            resolve(arr);
        }
    }
    return new Promise((resolve, reject) => {
        for (let i=0; i < promises.length; i++) {
            promises[i].then(data=>{
                processData(i,data);
            },reject);
        }
    })
}
(三)发布订阅模式
发布订阅模式定义了一种一对多关系,让多个观察者对象同时监听某一个主题对象,这个主题对象的状态发生变化时就会通知所有的观察者对象,使得它们能够自动更新自己。
和观察者模式的区别:
- 发布者(Publisher)和订阅者(Subscriber)之间没有直接的联系,而是通过消息传递中心,也就是称为消息代理(Message Broker)的中介来进行通信。当发布者发送一条消息时,消息代理会将此消息分发给所有订阅者。观察者模式中没有消息传递中心,观察者(Subject)维护一个观察者(Observer)列表,当被观察者的状态发生改变时,它会通知所有观察者。
- 发布者和订阅者之间的耦合度较低,因为它们没有直接联系,而是通过消息代理进行通信。被观察者和观察者之间的耦合度较高,因为它们直接建立关系,并通过引用进行通信。
例子:天气预报系统:当极端天气发生时,气象站会发布天气警报。建筑工地、船舶和游客将根据天气数据调整其日程安排。
一旦气象站发出天气警报,会做以下事情:
- 建筑工地:停工
- 船舶:系泊
- 游客:取消行程
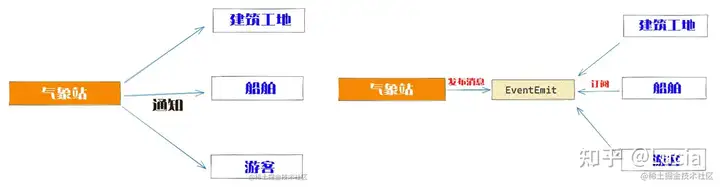
// 通知模式
function weatherWarning () {
    buildingsite.stopwork();
    ships.mooring();
    tourists.canceltrip();
}

// 发布订阅模式
const EventEmit = function () {
    this.events = {};
    // 绑定事件触发的回调函数
    this.on = function (evtName, callback) {
        const eventHandler = this.events[evtName];
        if (eventHandler) {
            this.events[evtName].push(callback);
        } else {
            this.events[evtName] = [callback];
        }
    };
    // 事件发生时,遍历触发所有回调函数
    this.trigger = function (evtName, ...args) {
        if (this.events[evtName]) {
            this.events[evtName].forEach((eventListener) => {
                eventListener(...args);
            });
        }
    }
}
const weatherEvent = new EventEmit();
weatherEvent.on("warning", function () {
    console.log("buildingsite.stopwork()");
});
weatherEvent.on("warning", function () {
    console.log("ships.mooring()");
});
weatherEvent.on("warning", function () {
    // tourists.canceltrip()
    console.log("tourists.canceltrip()");
});
weatherEvent.trigger("warning");
(四)Generator
声明:
function* gen(x) {
    const y = yield x + 6;
    return y;
}

function* genOne(x) {
    const y = `这是第一个yield执行:${yield x + 1}`;
    return y;
}
执行:
const g = gen(1);
//执行 Generator 会返回一个Object,而不是像普通函数返回return 后面的值

g.next() // { value: 7, done: false }
//调用指针的 next 方法,会从函数的头部或上一次停下来的地方开始执行,直到遇到下一个 yield 表达式或return语句暂停,也就是执行yield 这一行
// 执行完成会返回一个 Object,
// value 就是执行 yield 后面的值,done 表示函数是否执行完毕

g.next() // { value: undefined, done: true }
// 因为最后一行 return y 被执行完成,所以done 为 true

const g2 = genOne(1);
g.next();  // { value: 2, done: false }
g.next();  // { value: '这是第一个yield执行:undefined', done: true }
调用 Generator 函数后,该函数并不执行,返回的也不是函数运行结果,而是一个指向内部状态的指针对象,也就是遍历器对象(Iterator Object)。下一步,必须调用遍历器对象的next方法,使得指针移向下一个状态。
function* fetch() {
    yield ajax('aaa')
    yield ajax('bbb')
    yield ajax('ccc')
}
let gen = fetch()
let res1 = gen.next() // { value: 'aaa', done: false }
let res2 = gen.next() // { value: 'bbb', done: false }
let res3 = gen.next() // { value: 'ccc', done: false }
let res4 = gen.next() // { value: undefined, done: true } done为true表示执行结束
由于 Generator 函数返回的遍历器对象,只有调用next方法才会遍历下一个内部状态,所以其实提供了一种可以暂停执行的函数。yield表达式就是暂停标志。
遍历器对象的next方法的运行逻辑如下。
- 遇到
yield表达式,就暂停执行后面的操作,并将紧跟在yield后面的那个表达式的值,作为返回的对象的value属性值。 - 下一次调用
next方法时,再继续往下执行,直到遇到下一个yield表达式。 - 如果没有再遇到新的
yield表达式,就一直运行到函数结束,直到return语句为止,并将return语句后面的表达式的值,作为返回的对象的value属性值。 - 如果该函数没有
return语句,则返回的对象的value属性值为undefined。
yield表达式本身没有返回值,或者说总是返回undefined。next方法可以带一个参数,该参数就会被当作上一个yield表达式的返回值。
function* foo(x) {
  var y = 2 * (yield (x + 1));
  var z = yield (y / 3);
  return (x + y + z);
}

var a = foo(5);
a.next() // Object{value:6, done:false}
a.next() // Object{value:NaN, done:false}
a.next() // Object{value:NaN, done:true}

var b = foo(5);
b.next() // { value:6, done:false }
b.next(12) // { value:8, done:false }
b.next(13) // { value:42, done:true }
yield与return的区别
相同点:
- 都能返回语句后面的那个表达式的值
- 都可以暂停函数执行
区别:
- yield 有位置记忆功能,return 没有
(五)async / await
await只能在async函数中使用,不然会报错async函数返回的是一个Promise对象,可以使用then方法添加回调函数async函数内部return语句返回的值,会成为then方法回调函数的参数- 在
async中第一个await之前的代码会被同步执行
function request(num) {  // 模拟接口请求
    return new Promise(resolve => {
        setTimeout(() => {
            resolve(num * 2);
        }, 1000);
    });
}
async function fn() {
    const res1 = await request(5);
    const res2 = await request(res1);
    console.log(res2);  // 两秒后输出20
}
fn();
✨ 宏任务和微任务
宏任务是由宿主发起的,而微任务是由JS本身发起。
异步任务又分为宏任务和微任务,每一个宏任务执行完之后,都会检查是否存在待执行的微任务,如果有,则执行完所有微任务之后再继续执行下一个宏任务。
宏任务执行时,会阻塞页面渲染,微任务执行时,不会阻塞页面渲染。
- 宏任务:异步Ajax请求、setTimeout、setInterval、文件操作、requestAnimationFrame
- 微任务:Promise.then、.catch、.finally、process.nextTick
✨ 执行顺序相关题目
- Promise是一个类(函数),接受一个回调函数作为参数,并且这个回调函数有两个参数,这两个参数约定俗成被命名为
resolve,reject,这两个参数其实也都是函数。 - 对于紧跟Promise实例的
then,其参数等于resolve接受的参数;紧跟Promise实例的catch,其参数等于reject接受的参数。 - Promise的实例有三种状态:
pending(加载中)、fulfilled(执行成功)、rejected(执行错误),对应了异步正在执行和异步执行完的结果(成功或失败两种状态)这三种状态。三种状态的表现:- pending:Promise实例处于
pending状态时,不会触发then和catch。 - fufilled:Promise实例处于
fulfilled状态时,只会触发then(不会触发catch) - rejected:Promise实例处于
rejected状态时,只会触发catch(不会触发then)
- pending:Promise实例处于
- 当Promise内部的回调不执行
resolve或reject的时候,Promise实例就处于pending状态。对于第一个Promise实例执行参数resolve就代表了,当前Promise实例对象的状态为fulfilled,因此接下来可以触发then,以及对应的回调。如果Promise实例对象执行了reject,则实例对象的状态变为了rejected,可以触发catch。 - 无论是
then还是catch里的回调内容只要代码正常执行或者正常返回,则当前新的Promise实例为fulfilled状态。如果有报错或返回Promise.reject()则新的Promise实例为rejected状态。
Promise.resolve()  // 表示一个fulfilled状态的Promise实例
Promise.reject()   // 表示一个rejected状态的Promise实例
- 如果then、catch里的回调,没有写返回内容,则then或catch后面即将被触发的then或catch是无法接受到参数的;而如果有返回内容,即return... 那么无论返回的是普通值还是是Promise实例,其实都会对应被转化为Promise的实例(
Promise.resolve(...)或者Promise.reject(...)) - 执行
async函数,返回的是Promise对象,await必须在async包裹之下执行。await相当于Promise的then并且同一作用域下await下面的内容全部作为then中回调的内容,try……catch可捕获异常,代替了Promise的catch。异步中先执行微任务,再执行宏任务。 .then或.catch的参数期望是函数,传入非函数则会发生值透传。.finally()方法不管Promise对象最后的状态如何都会执行。.finally()方法的回调函数不接受任何的参数,也就是说你在.finally()函数中是无法知道Promise最终的状态是resolved还是rejected的。它最终返回的默认会是一个上一次的Promise对象值,不过如果抛出的是一个异常,则返回异常的Promise对象。
console.log(100);
setTimeout(() => {
  console.log(200);
})
Promise.resolve().then(() => {
  console.log(300);
})
console.log(400);
// 打印结果:100 400 300 200


Promise.resolve().then(() => {
  console.log(1);
  throw new Error('error1')
}).catch(() => {
  console.log(2);
}).then(() => {
  console.log(3);
})
// 打印结果:1 2 3


async function async1 () {
  console.log('async1 start');
  await async2();  // 执行到await code时,会先执行code,再执行await
  console.log('async1 end');
}
async function async2 () {
  console.log('async2');
}
console.log('script start');
setTimeout(function () {
  console.log('setTimeout');
}, 0)
async1()
new Promise (function (resolve) {
  console.log('promise1')
  resolve()
}).then(function () {
  console.log('promise2')
})
console.log('script end')
// 打印结果:script start, async1 start, async2, promise1, script end, async1 end, promise2, setTimeout


setTimeout(() => {
  console.log('0');
}, 0)
new Promise((resolve, reject) => {
  console.log('1');
  resolve();
}).then(() => {
  console.log('2');
  new Promise((resolve, reject) => {
    console.log('3');
    resolve();
  }).then(() => {
    console.log('4');  // 同层级
  }).then(() => {
    console.log('5');
  })
}).then(() => {
  console.log('6');  // 同层级
})
new Promise((resolve, reject) => {
  console.log('7');
  resolve()
}).then(() => {
  console.log('8');
})
// 打印结果:1, 7, 2, 3, 8, 4, 6, 5, 0


Promise.resolve(1)
  .then(2)
  .then(Promise.resolve(3))
  .then(console.log)
// 输出结果:1


Promise.resolve('1')
    .then(res => {
        console.log(res)
    })
    .finally(() => {
        console.log('finally')
    })
Promise.resolve('2')
    .finally(() => {
        console.log('finally2')
        return '我是finally2返回的值'
    })
    .then(res => {
        console.log('finally2后面的then函数', res)
    })
// 输出结果:
// 1
// finally2
// finally
// finally2后面的then函数 2
✨ webpack
webpack 是一个现代 JavaScript 应用程序的静态模块打包器,当 webpack 处理应用程序时,会递归构建一个依赖关系图,其中包含应用程序需要的每个模块,然后将这些模块打包成一个或多个 bundle(前端项目构建工具/打包工具)。提供了友好的模块化支持,以及代码压缩混淆、处理JS兼容问题、性能优化等强大的功能。
webpack基本配置(webpack.config.js)
// 导入生成预览页面的插件
const HtmlWebpackPlugin = require('html-webpack-plugin')
// 创建插件的实例对象
const htmlPlugin = new HtmlWebpackPlugin({
    template: './src/index.html',  // 指定要用到的模板文件
    filename: 'index.html'  // 指定生成的文件名称,该文件存在于内存中,在目录中不显示
})

module.exports = {
	mode: 'development',
	entry: 'path.join(__dirname, './src/index.js')',
	output: {
		path: path.join(__dirname, './dist'),
		filename: 'bundle.js'
	},
    plugins: [ htmlPlugin ],
    module: {
        rules: [
            // 打包处理css文件
            { test: /\.css$/, use: ['style-loader', 'css-loader'] },
            // 打包处理less文件
            { test: /\.less$/, use: ['style-loader', 'css-loader', 'less-loader'] },
            // 打包处理scss文件
            { test: /\.scss$/, use: ['style-loader', 'css-loader', 'sass-loader'] },
            //打包处理样式表中的图片和字体文件
            { test: /\.jpg|png|gif|bmp|ttf|eot|svg|woff|woff2$/, use: 'url-loader?limit=16940' },
            // 打包处理js文件中的高级语法
            // exclude为排除项,表示babel-loader不需要处理node_modules中的js文件
            { test: /\.js$/, use: 'babel-loader', exculde: /node_modules/ }
        ]
    }
}
webpack配置参数
- mode:用来指定构建模式,
development表示通过开发模式进行构建,转换出来的代码不会进行压缩与混淆,转换速度快;production表示产品发布模式,会对转换出来的代码进行压缩与混淆,转换速度慢。 - entry:配置打包入口文件的路径,默认打包入口文件为
src/index.js。 - output:配置打包输出文件的存放路径(path属性)和输出文件名称(输出文件的名称),默认打包的输出文件为
dist/bundle.js。 - plugins:plugins数组是webpack打包期间会用到的一些插件列表。
- module:所有第三方文件模块的匹配规则
webpack中的加载器
在实际开发过程中,webpack默认只能打包处理以.js后缀名结尾的模块,其他非.js后缀名结尾的模块,webpack默认处理不了,需要调用loader加载器才可以正常打包,否则会报错。
在 webpack.config.js 的 module → rules 数组中,添加loader规则,test表示匹配的文件类型,use表示对应要调用的loader。use数组中指定的loader顺序是固定的,多个loader的调用顺序是从后往前调用的。
处理js文件中的高级语法
创建babel配置文件:babel.config.js 并初始化基本配置:
module.exports = {
    presets: [ '@babel/preset-env' ],
    plugins: [ '@babel/plugin-transform-runtime', '@babel/plugin-proposal-class-properties' ]
}
Loader和Plugin的区别
- Loader(加载器):Webpack将一切文件视为模块,单Webpack的原生是只能解析js文件,如果想把其它文件打包的话,就会用到Loader,所以Loader的作用是让Webpack拥有了加载和解析非js文件的能力。
- Plugin(插件):Plugin可以扩展Webpack的功能,让Webpack具有更多的灵活性,在Webpack运行的生命周期中会广播出许多事件,Plugin可以监听这些事件,在合适的时机通过Webpack提供的API改变输出结果。
常见的Loader和Plugin
- Loader
| Loader | 作用 |
|---|---|
| babel-loader | 把ES6或React转换成ES5 |
| css-loader | 加载CSS,支持模块化、压缩、文件导入等特性 |
| eslint-loader | 代码检查 |
| file-loader | 输出文件 |
| url-loader | 和file-loader类似,但是小文件可以以base64的形式输出 |
| sass-loader | 把sass编译成css |
| postcss-loader | 使用postcss来处理css |
| style-loader | 把css代码注入到JS中,通过DOM操作来加载CSS |
- Plugin
| Plugin | 作用 |
|---|---|
| DefinePlugin | 创建一个编译时可配置的全局常量 |
| HotModuleReplacementPlugin | 启动模块热替换 |
| html-webpack-plugin | 自动生成带有入口文件引用的index.html |
| optimize-css-assets-webpack-plugin | 用于优化或者压缩css资源 |
| ModuleNotFoundPlugin | 找不到模块的时候提供一下更详细的上下文信息 |
| webpack-manifest-plugin | 生产资产的显示清单文件 |
| ModuleScopePlugin | 引用了src目录外的文件报警插件 |
Webpack构建流程
初始化参数:从配置文件和 Shell 语句中读取与合并参数,得出最终的参数开始编译:用上一步得到的参数初始化 Compiler 对象,加载所有配置的插件,执行对象的 run 方法开始执行编译确定入口:根据配置中的 entry 找出所有的入口文件编译模块:从入口文件出发,调用所有配置的 Loader 对模块进行翻译,再找出该模块依赖的模块,再递归本步骤直到所有入口依赖的文件都经过了本步骤的处理完成模块编译:在经过第4步使用 Loader 翻译完所有模块后,得到了每个模块被翻译后的最终内容以及它们之间的依赖关系输出资源:根据入口和模块之间的依赖关系,组装成一个个包含多个模块的 Chunk,再把每个 Chunk 转换成一个单独的文件加入到输出列表,这步是可以修改输出内容的最后机会输出完成:在确定好输出内容后,根据配置确定输出的路径和文件名,把文件内容写入到文件系统
简单说
- 初始化:启动构建,读取与合并配置参数,加载 Plugin,实例化 Compiler
- 编译:从 Entry 出发,针对每个 Module 串行调用对应的 Loader 去翻译文件的内容,再找到该 Module 依赖的 Module,递归地进行编译处理
- 输出:将编译后的 Module 组合成 Chunk,将 Chunk 转换成文件,输出到文件系统中
Source Map
source map是为了解决开发代码与实际运行代码不一致是帮助我们debug到原始开发代码的技术,是将编译、打包、压缩后的代码映射回源代码的过程。打包压缩后的代码不具备良好的可读性,想要调试源码就需要 soucre map。
nosources-source-map:只会显示具体行数以及查看源代码的错误栈。安全性比 sourcemap 高
文件监听原理
在发现源码发生变化时,自动重新构建出新的输出文件。
Webpack开启监听模式,有两种方式:
- 启动 webpack 命令时,带上 --watch 参数
- 在配置 webpack.config.js 中设置 watch:true
缺点:每次需要手动刷新浏览器
原理:轮询判断文件的最后编辑时间是否变化,如果某个文件发生了变化,并不会立刻告诉监听者,而是先缓存起来,等 aggregateTimeout 后再执行。
Webpack热更新原理
Webpack 的热更新又称热替换(Hot Module Replacement),缩写为 HMR。 这个机制可以做到不用刷新浏览器而将新变更的模块替换掉旧的模块。
HMR的核心就是客户端从服务端拉去更新后的文件,准确的说是 chunk diff (chunk 需要更新的部分),实际上 WDS 与浏览器之间维护了一个 Websocket,当本地资源发生变化时,WDS (webpack dev server)会向浏览器推送更新,并带上构建时的 hash,让客户端与上一次资源进行对比。客户端对比出差异后会向 WDS 发起 Ajax 请求来获取更改内容(文件列表、hash),这样客户端就可以再借助这些信息继续向 WDS 发起 jsonp 请求获取该chunk的增量更新。


