Flutter 开发详解:自定义布局实战
一、前言
在之前的篇章我们讲过 Widget 、Element 和 RenderObject 之间的关系,所谓的 自定义布局,事实上就是自定义 RenderObject 内 child 的大小和位置 ,而在这点上和其他框架不同的是,在 Flutter 中布局的核心并不是嵌套堆叠,Flutter 布局的核心是在于 Canvas ,我们所使用的 Widget ,仅仅是为了简化 RenderObject 的操作。
在《九、 深入绘制原理》的测试绘制 中我们知道, 对于 Flutter 而言,整个屏幕都是一块画布,我们通过各种
Offset和Rect确定了位置,然后通过Canvas绘制 UI,而整个屏幕区域都是绘制目标,如果在child中我们 “不按照套路出牌” ,我们甚至可以不管parent的大小和位置随意绘制。
二、MultiChildRenderObjectWidget
了解基本概念后,我们知道 自定义 Widget 布局的核心在于自定义 RenderObject ,而在官方默认提供的布局控件里,大部分的布局控件都是通过继承 MultiChildRenderObjectWidget 实现,那么一般情况下自定义布局时,我们需要做什么呢?
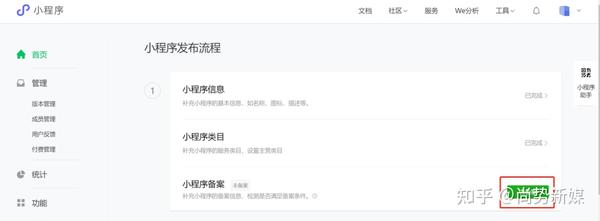
如上图所示,一般情况下实现自定义布局,我们会通过继承 MultiChildRenderObjectWidget 和 RenderBox 这两个 abstract 类实现,而 MultiChildRenderObjectElement 则负责关联起它们, 除了此之外,还有有几个关键的类 : ContainerRenderObjectMixin 、 RenderBoxContainerDefaultsMixin 和 ContainerBoxParentData 。
RenderBox 我们知道是 RenderObject 的子类封装,也是我们自定义 RenderObject 时经常需要继承的,那么其他的类分别是什么含义呢?
1、ContainerRenderObjectMixin
故名思义,这是一个 mixin 类,ContainerRenderObjectMixin 的作用,主要是维护提供了一个双链表的 children RenderObject 。
通过在 RenderBox 里混入 ContainerRenderObjectMixin , 我们就可以得到一个双链表的 children ,方便在我们布局时,可以正向或者反向去获取和管理 RenderObject 们 。
2、RenderBoxContainerDefaultsMixin
RenderBoxContainerDefaultsMixin 主要是对 ContainerRenderObjectMixin 的拓展,是对 ContainerRenderObjectMixin 内的 children 提供常用的默认行为和管理,接口如下所示:
	/// 计算返回第一个 child 的基线 ,常用于 child 的位置顺序有关
	double defaultComputeDistanceToFirstActualBaseline(TextBaseline baseline)

	/// 计算返回所有 child 中最小的基线,常用于 child 的位置顺序无关
	double defaultComputeDistanceToHighestActualBaseline(TextBaseline baseline)

	/// 触摸碰撞测试
	bool defaultHitTestChildren(BoxHitTestResult result, { Offset position })

	/// 默认绘制
	void defaultPaint(PaintingContext context, Offset offset)

	/// 以数组方式返回 child 链表
	List<ChildType> getChildrenAsList()

复制代码
3、ContainerBoxParentData
ContainerBoxParentData 是 BoxParentData 的子类,主要是关联了 ContainerDefaultsMixin 和 BoxParentData ,BoxParentData 是 RenderBox 绘制时所需的位置类。
通过 ContainerBoxParentData ,我们可以将 RenderBox 需要的 BoxParentData 和上面的 ContainerParentDataMixin 组合起来,事实上我们得到的 children 双链表就是以 ParentData 的形式呈现出来的。
abstract class ContainerBoxParentData<ChildType extends RenderObject> extends BoxParentData with ContainerParentDataMixin<ChildType> { }
复制代码
4、MultiChildRenderObjectWidget
MultiChildRenderObjectWidget 的实现很简单 ,它仅仅只是继承了 RenderObjectWidget,然后提供了 children 数组,并创建了 MultiChildRenderObjectElement。
上面的
RenderObjectWidget顾名思义,它是提供RenderObject的Widget,那有不存在RenderObject的Widget吗?有的,比如我们常见的
StatefulWidget、StatelessWidget、Container等,它们的Element都是ComponentElement,ComponentElement仅仅起到容器的作用,而它的get renderObject需要来自它的child。
5、MultiChildRenderObjectElement
前面的篇章我们说过 Element 是 BuildContext 的实现, 内部一般持有 Widget 、RenderObject 并作为二者沟通的桥梁,那么 MultiChildRenderObjectElement 就是我们自定义布局时的桥梁了, 如下代码所示,MultiChildRenderObjectElement 主要实现了如下接口,其主要功能是对内部 children 的 RenderObject ,实现了插入、移除、访问、更新等逻辑:
	/// 下面三个方法都是利用 ContainerRenderObjectMixin 的 insert/move/remove 去操作
	/// ContainerRenderObjectMixin<RenderObject, ContainerParentDataMixin<RenderObject>
	void insertChildRenderObject(RenderObject child, Element slot)
	void moveChildRenderObject(RenderObject child, dynamic slot)
	void removeChildRenderObject(RenderObject child)

	/// visitChildren 是通过 Element 中的 ElementVisitor 去迭代的
	/// 一般在 RenderObject get renderObject 会调用
	void visitChildren(ElementVisitor visitor)

	/// 添加忽略child _forgottenChildren.add(child);
	void forgetChild(Element child)

	/// 通过 inflateWidget , 把 children 中 List<Widget> 对应的 List<Element>
	void mount(Element parent, dynamic newSlot)

	/// 通过 updateChildren 方法去更新得到  List<Element>
	void update(MultiChildRenderObjectWidget newWidget)

复制代码
所以 MultiChildRenderObjectElement 利用 ContainerRenderObjectMixin 最终将我们自定义的 RenderBox 和 Widget 关联起来。
6、自定义流程
上述主要描述了 MultiChildRenderObjectWidget 、 MultiChildRenderObjectElement 和其他三个辅助类ContainerRenderObjectMixin 、 RenderBoxContainerDefaultsMixin 和 ContainerBoxParentData 之间的关系。
了解几个关键类之后,我们看一般情况下,实现自定义布局的简化流程是:
- 1、自定义
ParentData继承ContainerBoxParentData。 - 2、继承
RenderBox,同时混入ContainerRenderObjectMixin和RenderBoxContainerDefaultsMixin实现自定义RenderObject。 - 3、继承
MultiChildRenderObjectWidget,实现createRenderObject和updateRenderObject方法,关联我们自定义的RenderBox。 - 4、override
RenderBox的performLayout和setupParentData方法,实现自定义布局。
当然我们可以利用官方的 CustomMultiChildLayout 实现自定义布局,这个后面也会讲到,现在让我们先从基础开始, 而上述流程中混入的 ContainerRenderObjectMixin 和 RenderBoxContainerDefaultsMixin ,在 RenderFlex 、RenderWrap 、RenderStack 等官方实现的布局里,也都会混入它们。
三、自定义布局
自定义布局就是在 performLayout 中实现的 child.layout 大小和 child.ParentData.offset 位置的赋值。
首先我们要实现类似如图效果,我们需要自定义 RenderCloudParentData 继承 ContainerBoxParentData ,用于记录宽高和内容区域 :
class RenderCloudParentData extends ContainerBoxParentData<RenderBox> {
  double width;
  double height;

  Rect get content => Rect.fromLTWH(
        offset.dx,
        offset.dy,
        width,
        height,
      );
}

复制代码
然后自定义 RenderCloudWidget 继承 RenderBox ,并混入 ContainerRenderObjectMixin 和 RenderBoxContainerDefaultsMixin 实现 RenderBox 自定义的简化。
class RenderCloudWidget extends RenderBox
    with
        ContainerRenderObjectMixin<RenderBox, RenderCloudParentData>,
        RenderBoxContainerDefaultsMixin<RenderBox, RenderCloudParentData> {
  RenderCloudWidget({
    List<RenderBox> children,
    Overflow overflow = Overflow.visible,
    double ratio,
  })  : _ratio = ratio,
        _overflow = overflow {
   ///添加所有 child
    addAll(children);
  }
复制代码
如下代码所示,接下来主要看 RenderCloudWidget 中override performLayout 中的实现,这里我们只放关键代码:
- 1、我们首先拿到
ContainerRenderObjectMixin链表中的firstChild,然后从头到位读取整个链表。 - 2、对于每个 child 首先通过
child.layout设置他们的大小,然后记录下大小之后。 - 3、以容器控件的中心为起点,从内到外设置布局,这是设置的时候,需要通过记录的
Rect判断是否会重复,每次布局都需要计算位置,直到当前 child 不在重复区域内。 - 4、得到最终布局内大小,然后设置整体居中。
///设置为我们的数据
@override
void setupParentData(RenderBox child) {
  if (child.parentData is! RenderCloudParentData)
    child.parentData = RenderCloudParentData();
}

@override
  void performLayout() {
    ///默认不需要裁剪
    _needClip = false;

    ///没有 childCount 不玩
    if (childCount == 0) {
      size = constraints.smallest;
      return;
    }

    ///初始化区域
    var recordRect = Rect.zero;
    var previousChildRect = Rect.zero;

    RenderBox child = firstChild;

    while (child != null) {
      var curIndex = -1;

      ///提出数据
      final RenderCloudParentData childParentData = child.parentData;

      child.layout(constraints, parentUsesSize: true);

      var childSize = child.size;

      ///记录大小
      childParentData.width = childSize.width;
      childParentData.height = childSize.height;

      do {
        ///设置 xy 轴的比例
        var rX = ratio >= 1 ? ratio : 1.0;
        var rY = ratio <= 1 ? ratio : 1.0;

        ///调整位置
        var step = 0.02 * _mathPi;
        var rotation = 0.0;
        var angle = curIndex * step;
        var angleRadius = 5 + 5 * angle;
        var x = rX * angleRadius * math.cos(angle + rotation);
        var y = rY * angleRadius * math.sin(angle + rotation);
        var position = Offset(x, y);

        ///计算得到绝对偏移
        var childOffset = position - Alignment.center.alongSize(childSize);

        ++curIndex;

        ///设置为遏制
        childParentData.offset = childOffset;

        ///判处是否交叠
      } while (overlaps(childParentData));

      ///记录区域
      previousChildRect = childParentData.content;
      recordRect = recordRect.expandToInclude(previousChildRect);

      ///下一个
      child = childParentData.nextSibling;
    }

    ///调整布局大小
    size = constraints
        .tighten(
          height: recordRect.height,
          width: recordRect.width,
        )
        .smallest;

    ///居中
    var contentCenter = size.center(Offset.zero);
    var recordRectCenter = recordRect.center;
    var transCenter = contentCenter - recordRectCenter;
    child = firstChild;
    while (child != null) {
      final RenderCloudParentData childParentData = child.parentData;
      childParentData.offset += transCenter;
      child = childParentData.nextSibling;
    }

    ///超过了嘛?
    _needClip =
        size.width < recordRect.width || size.height < recordRect.height;
  }
复制代码
其实看完代码可以发现,关键就在于你怎么设置 child.parentData 的 offset ,来控制其位置。
最后通过 CloudWidget 加载我们的 RenderCloudWidget 即可, 当然完整代码还需要结合 FittedBox 与 RotatedBox 简化完成,具体可见 :GSYFlutterDemo
class CloudWidget extends MultiChildRenderObjectWidget {
  final Overflow overflow;
  final double ratio;

  CloudWidget({
    Key key,
    this.ratio = 1,
    this.overflow = Overflow.clip,
    List<Widget> children = const <Widget>[],
  }) : super(key: key, children: children);

  @override
  RenderObject createRenderObject(BuildContext context) {
    return RenderCloudWidget(
      ratio: ratio,
      overflow: overflow,
    );
  }

  @override
  void updateRenderObject(
      BuildContext context, RenderCloudWidget renderObject) {
    renderObject
      ..ratio = ratio
      ..overflow = overflow;
  }
}
复制代码
最后我们总结,实现自定义布局的流程就是,实现自定义 RenderBox 中 performLayout child 的 offset 。
四、CustomMultiChildLayout
CustomMultiChildLayout 是 Flutter 为我们封装的简化自定义布局实现,它的内部同样是通过 MultiChildRenderObjectWidget 实现,但是它为我们封装了 RenderCustomMultiChildLayoutBox 和 MultiChildLayoutParentData ,并通过 MultiChildLayoutDelegate 暴露出需要自定义的地方。

使用 CustomMultiChildLayout 你只需要继承 MultiChildLayoutDelegate ,并实现如下方法即可:
  void performLayout(Size size);

  bool shouldRelayout(covariant MultiChildLayoutDelegate oldDelegate);

复制代码
通过继承 MultiChildLayoutDelegate,并且实现 performLayout 方法,我们可以快速自定义我们需要的控件,当然便捷的封装也代表了灵活性的丧失,可以看到 performLayout 方法中只有布局自身的 Size 参数,所以完成上图需求时,我们还需要 child 的大小和位置 ,也就是 childSize 和 childId 。
childSize 相信大家都能故名思义,那 childId 是什么呢?
这就要从 MultiChildLayoutDelegate 的实现说起,在 MultiChildLayoutDelegate 内部会有一个 Map<Object, RenderBox> _idToChild; 对象,这个 Map 对象保存着 Object id 和 RenderBox 的映射关系,而在 MultiChildLayoutDelegate 中获取 RenderBox 都需要通过 id 获取。
_idToChild 这个 Map 是在 RenderBox performLayout 时,在 delegate._callPerformLayout 方法内创建的,创建后所用的 id 为 MultiChildLayoutParentData 中的 id, 而 MultiChildLayoutParentData 的 id ,可以通过 LayoutId 嵌套时自定义指定赋值。
而完成上述布局,我们需要知道每个 child 的 index ,所以我们可以把 index 作为 id 设置给每个 child 的 LayoutId 。
所以我们可以通过 LayoutId 指定 id 为数字 index , 同时告知 delegate ,这样我们就知道 child 顺序和位置啦。
这个 id 是
Object类型 ,所以你懂得,你可以赋予很多属性进去。
如下代码所示,这样在自定义的 CircleLayoutDelegate 中,就知道每个控件的 index 位置,也就是知道了,圆形布局中每个 item 需要的位置。
我们只需要通过 index ,计算出 child 所在的角度,然后利用 layoutChild 和 positionChild 对每个item进行布局即可,完整代码:GSYFlutterDemo
///自定义实现圆形布局
class CircleLayoutDelegate extends MultiChildLayoutDelegate {
  final List<String> customLayoutId;

  final Offset center;

  Size childSize;

  CircleLayoutDelegate(this.customLayoutId,
      {this.center = Offset.zero, this.childSize});

  @override
  void performLayout(Size size) {
    for (var item in customLayoutId) {
      if (hasChild(item)) {
        double r = 100;

        int index = int.parse(item);

        double step = 360 / customLayoutId.length;

        double hd = (2 * math.pi / 360) * step * index;

        var x = center.dx + math.sin(hd) * r;

        var y = center.dy - math.cos(hd) * r;

        childSize ??= Size(size.width / customLayoutId.length,
            size.height / customLayoutId.length);

        ///设置 child 大小
        layoutChild(item, BoxConstraints.loose(childSize));

        final double centerX = childSize.width / 2.0;

        final double centerY = childSize.height / 2.0;

        var result = new Offset(x - centerX, y - centerY);

        ///设置 child 位置
        positionChild(item, result);
      }
    }
  }

  @override
  bool shouldRelayout(MultiChildLayoutDelegate oldDelegate) => false;
}
复制代码
总的来说,第二种实现方式相对简单,但是也丧失了一定的灵活性,可自定义控制程度更低,但是也更加规范与间接,同时我们自己实现 RenderBox 时,也可以用类似的 delegate 的方式做二次封装,这样的自定义布局会更行规范可控。
作者:恋猫de小郭
链接:https://juejin.im/post/5d1af0aee51d454fbf540a52
来源:掘金
著作权归作者所有。商业转载请联系作者获得授权,非商业转载请注明出处。